Ticket Timeline View
The Timeline view provides your agents an overview of the tickets that were received from a requestor over the recent past. It will fetch the tickets based on the contact who has sent the ticket and presents it in a chronological order.
Here are some of the advantages of the timeline view in tickets:
- Helps your agents to figure out whether the requestor is new or returning. You can drive targeted engagement by assigning the ticket to an agent who has handled the customer on previous occasions.
- Determine the frame of mind of your customers by looking at the happiness rating left on their previous ticket.
- Understand the context of the customer's request by looking at the solutions that was offered previously.
- Merge the tickets if you have receive two or more support tickets about the same issue.
To view the timeline of a ticket:
- Open a ticket in its detail view.
- Click the
 icon in the upper corner of the left panel.
The timeline will display the Subject, Ticket Owner and the Status of the tickets that were received from the customer. If there aren't any prior tickets, the timeline will display the current ticket.
To merge tickets from the timeline:
- Open a ticket in its detail view.
- Click the
 icon in the upper corner of the left panel.
 - Check the tickets you intend to merge from the timeline.
- Click Merge in the timeline.
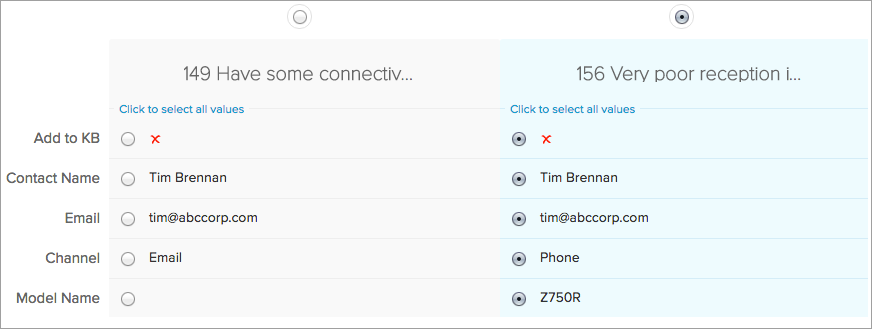
- Select the fields from the tickets, for its data to be retained in the Master Ticket.
- Click Merge again.
Here are some Tips to help you Merge Tickets:
- You cannot merge more than three tickets at an instance.
- The ticket that was first created in your help desk, will by default be considered as the master ticket. You can also specify the master ticket(by their Ticket Id) to be created.
- The master ticket will keep the date and time of its creation besides other read only or hidden field values.
- The values that were selected amongst the tickets will be merged into the master ticket.
- All the records including attachments, tasks, products etc., from the other tickets will be added to the master ticket.
- Please exercise caution as you cannot undo or revert a ticket merge.
Related Articles
Ticket Timeline View
The Timeline view provides an overview of the tickets received from a customer over the recent past. It will fetch the tickets received from a contact and presents them in chronological order. Advantages of Timeline View It helps your agents to know ...How to star a ticket list view?
Views help you to filter out tickets based on your preference so that you don't have to go through all the tickets in your Zoho Desk. You can go a step further and star certain views so that you don't even have to go through the hassle of going ...View the Original Email of a Ticket in Zoho Desk
Typically the email content that was sent by your customers will be formatted and displayed in a style that is followed across Zoho Desk. For example, the email body text will be displayed using the font called Proxima Nova. Formatting is performed ...View the Original Email of a Ticket in Zoho Desk
Typically the email content that is sent by your customers will be formatted and displayed in a style that is followed across Zoho Desk. For example, the email body text will be displayed using the font called Proxima Nova. This kind of formatting is ...Ticket Queues
Ticket Queues are designed to provide a highly efficient, yet simple means of providing customer support. A queue is a sequence of tickets that are ordered based on their due time. To start with, Zoho Desk provides you with 3 different queues. They ...