Working with Tickets in the Android App
The Zoho Desk software enables users and agents to efficiently resolve customer issues. Each issue or complaint that an agent receives from customers is called a ticket. The ticket management system automates the resolution process.
Now that we are familiar with terms, such as ticket and ticket management, let us quickly get into the details of managing tickets.
Managing Tickets
Viewing Starred Ticket Views
You can view only starred ticket views and cannot create a starred view using the Zoho Desk mobile app.
To view starred ticket views, perform the following steps:
- Click the hamburger menu icon at he upper-left corner of the home screen.
- Notice that all starred ticket views are displayed at the top of the tickets views list.
- Click a category of your choice to view the tickets in the starred view.
You cannot include a ticket view in the starred view list using the mobile app.
Searching for Departments and Tickets
Searching for Departments
How to search for a department
- On the home screen, click the hamburger icon at the upper-left corner.
- In the displayed screen, click the Department drop-down arrow, as shown in the image below.
- From the displayed list of departments, select the required department.
- Notice that the tickets related to the selected department is now displayed for you.
Searching Tickets
How to search for a ticket
- Go to one of the ticket view page.
- Click the magnifying glass icon.
- In the Search Tickets field, do one of the following.
- Click inside the text field, enter the search text.
- Then, click the search filter icon at the upper-right corner of the page.
- Choose either from all departments or from the current department.
- From the displayed list of tickets, select the required ticket.
Searching for Ticket Views
How to search for a ticket view
- On the home screen, click the hamburger icon at the upper-left corner.
- In the displayed screen, scroll down the screen to see all the tickets views.
- From the listed views, select the required view.
- You can view the tickets pertaining to that particular view.
Adding Tickets
How to add a ticket
- On the home screen, click the add icon at the bottom-right corner of the screen, as shown in the image below.
- In the Add Ticket page, enter the details as shown in the image below.
- Click the right mark at the upper-right corner to save the ticket.
Setting Ticket Due Date
You can set the due date of a ticket while creating a ticket and change it later using the edit option.
However, you can also use the following steps to directly change the ticket due date:
- In an open ticket, click the Set Due Date drop-down arrow.
- In the displayed calendar, set the due Date and Time of ticket resolution.
Setting Ticket Status
You can set the status of a ticket while creating a ticket and change it later using the edit option.
However, you can also use the following steps to directly change the ticket status:
You can set the status of a ticket using the following steps:
- In an open ticket, click the status drop-down arrow.
- In the displayed list of statuses, select the required status.
Setting Ticket Priority
You can set the priority level of a ticket while creating a ticket and change it later using the edit option.
However, you can also use the following steps to directly change the ticket priority:
You can set the priority of a ticket using the following steps:
- In an open ticket, click the priority drop-down arrow.
- In the displayed list of levels, select the appropriate one.
Ticket Actions
You can perform the following action on a ticket using the more actions icon.
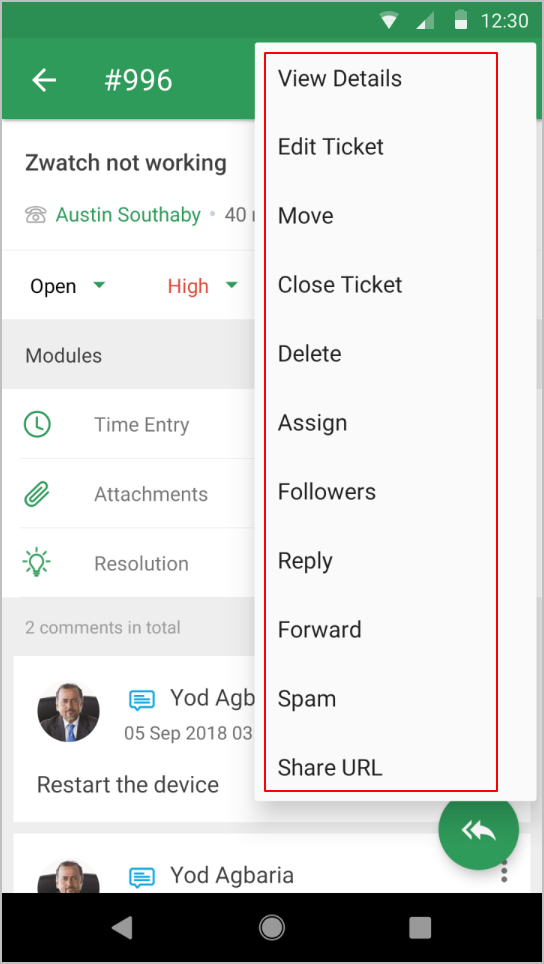
Actions | Enables you to |
View Details | View details and history of the ticket |
Edit Ticket | Edit existing details in the ticket |
Move | Move the ticket from the existing department to another |
Close Tickets/Open Ticket | Close the open ticket or open a closed ticket |
Delete | Delete the ticket |
Assign | Assign an agent to a ticket |
Followers | Add other agents as followers to the ticket |
Reply | Reply to the ticket comment |
Forward | Forward the ticket to another agent |
Spam | Mark the ticket as spam |
Share URL | Share the ticket URL with another agent |
Viewing Ticket Details and History
- Open a ticket.
- Click the more icon at the upper-right corner.
- Click View Details to view the ticket details.
- If required, click the Edit button to edit the ticket details.
- Similarly, click the History tab to view the history of the ticket.
Editing Tickets
How to edit a ticket
- Open a ticket that you want to edit.
- Click the more actions icon, and select Edit Ticket.
- Edit the required fields.
- Click the right mark at the upper-right corner.
Spamming or Deleting a Ticket
You can directly mark a ticket as spam or close a ticket using the more icon at the upper-right corner of a ticket.
How to mark a ticket as spam
- Click the more icon at the upper-right corner of a ticket.
- Select Spam.
How to delete a ticket
- Click the more icon at the upper-right corner of a ticket.
- Click Delete.
- Click Delete in the pop-up box to confirm deletion of the ticket.
Sharing URL and Adding Followers
You can share the URL of a ticket with other agents using the Share URL option. You can add other agents as followers to your ticket using the Followers option.
How to share ticket URL
- Click the more icon at the upper-right corner of a ticket.
- Click Share URL.
- Choose one of the options displayed in the image below.
How to add followers to a ticket
- Click the more icon at the upper-right corner of a ticket.
- Click Followers.
- Search for agents whom you would like to add as followers to the ticket.
Assigning an Agent
You can assign an agent to a ticket at two stages. They are as follows:
- Assign an agent when creating a ticket.
- Assign an agent to an unassigned ticket.
How to assign an agent to an unassigned ticket
- Open an unassigned ticket.
- Do one of the following two options:
- Click the Assign Agent/Add Agent icon at the upper-right corner.
- Click the more icon at the upper-right corner of a ticket, and then select Assign.
- Click and hold a ticket that is listed in one of the ticket view columns, and then select Assign in the pop-up actions.
In the Assign To page, select one of the following.
- Agents - Assign an agent directly to the ticket
- Teams - Select a team to which you want to assign a ticket
- The image of the selected agent will be displayed in the placeholder.
Viewing Related Information Modules in a Ticket
You can add a resolution to a ticket, enter the number of hours/minutes that you worked on the ticket, and also send attachments to a ticket using the related information options.
You can click the icons highlighted in the below image to perform the tasks directly. You can can expand the section using the drop-down arrow and choose to perform the following tasks.
- Time Entry - Click the
icon, and in the displayed Add Time Entry page, enter the required details and then click Save.
- Attachment - Click the
icon and then select the required file that you want to attach to the ticket.
- Resolution - Click the
icon and then in the displayed Resolution page, enter a resolution for the ticket, and then click Add.
Attaching a file to a Ticket
- Open a ticket.
- Click the attachment icon.
- In the Attachments page, click the plus icon at the lower-right corner.
- Select the required file and click Upload.
- You can choose to set the attachment as public or private. Click the more icon at the upper-right corner and choose either Public or Private.
Deleting an attachment
To delete the attachment:
- Click and hold the attachment for selection.
- Click the Delete icon.
Understanding the Different Ticket Views and Modes
Zoho Desk allows you to view the conversation details in a ticket in three different ways. You can view the details either as threads, conversation, or comments.
Conversation View
The conversation view is where the thread exchanges and the comments are displayed in one place, making it easier for you to understand the context of a ticket. You can read through the conversations and the related comments inline without switching between the tabs. You can differentiate between a thread and a comment with certain subtle visual cues. Tickets open to the Conversation View when you access them for the very first time. However, you can switch between the views.
Thread View
All email exchanges between you and your end user are grouped into threads. These threads are listed chronologically where the latest interaction stays at the top.
You can reply, reply all, forward, and also print the email messages. To do so, click the more icon, and then select the required action.
How to reply to a comment or create a draft message
- Click Reply shown in the below image.
- In the Compose page, enter your message.
- If required, you can click the Templates icon to change the template for your message.
- From the displayed templates, choose a template of your choice.
- In the Compose page, either check or uncheck the Private option.
- If required, you can save your message as a draft, which you can resume working on or send to a recipient at a later stage. To do so, click the back button at the upper-left corner of the screen, highlighted in the below image.
- Then, click Save in the pop-up message, as shown in the image below.
How to view a draft message
To view a ticket that has a draft message, perform the following steps:
- Click the Drafts icon at the lower-left corner of a ticket to directly edit the draft message.
- Or, click the more icon and choose one of the options displayed in the image below.
- You can click Send Draft to directly send the message to the recipient without editing the message.
- If required, edit the draft message, and then click the Send Now button to send the message to the recipient after editing.
Comments View
You can view the all existing comments in a ticket.
To add a comment to a ticket, do the following steps:
- Click the Comments icon at the upper-right corner of a ticket.
- In the Add Comment page, enter your comment.
- Check the Private checkbox if you want to make your comment private, that is, the comment will be displayed only to the support team. The comment will remain public, that is, the comment will be displayed in customer portal, if the checkbox is unchecked.
- Click the send button at the upper-right corner of the screen.
- You can also edit or delete a comment. To do so, click more actions, and then select the required action in the pop-up menu.
Tickets View Modes
Tickets view mode in Zoho Desk enables you to view support tickets in three different modes.
List Mode
In List mode, you can view the support tickets one below the other. Tickets in this mode will automatically move to the top of the list, so you can stay updated without having to hit the refresh button.
Queue Mode
The Countdown mode help you see which tickets need your attention and prioritize appropriately. It also helps you identify and anticipate peak times as well as quickly close tickets that are about to become overdue. The countdown ticket columns are dynamic—that is, a ticket will move from one column to another based on ticket submission time.
CRM Queue Mode
The Zoho CRM Queue Mode orders your help desk tickets into columns based on customer type in Zoho CRM, allowing your support team to focus on support. The support tickets are quickly examined for their contact type in Zoho CRM and added to the appropriate column. Typically, a ticket's column is determined based on the contact's email address or their phone number in Zoho CRM.
Actions you can perform in all the modes
You can click and hold a ticket for a second or two and then do all of the following:
- Move - Move the ticket from one department to another.
- Close - Close the ticket.
- Assign - Assign the ticket to an agent.
- Pick Up - Pick up the ticket as an agent.
Related Articles
Working with the ASAP Add-Ons for Mobile Platforms
The ASAP SDKs for mobile platforms--iOS and Android--make help available within quick reach for the end-users of your mobile apps. Using these SDKs, you can create and customize add-ons that reside within your app and provide end-users with easy ...Working with Tickets in the iOS App
The Zoho Desk software enables users and agents to efficiently resolve customer issues. Each issue or complaint that an agent receives from customers is called a ticket. The ticket management system automates the resolution process. Now that we are ...Managing Zoho Desk Settings in the Android App
Be it aesthetic appearance or user, product, project, or customer requirement, the need for change is unending. Hence, we at Zoho Desk, understand the need for providing "Settings" as an option to provide users the ability to make some changes to ...Working with the ASAP Add-On for the Web
Working with the ASAP Add-On for the Web Table of contents Introduction Setting up the ASAP Add-On Customizing the ASAP Icon Introduction The ASAP add-on for websites makes your help center available within quick reach for your end-customers. By ...Working with the ASAP Extension for Google Chrome
Introduction The ASAP extension for Google Chrome is a nifty tool that helps you bridge your website with your knowledge base for the benefit of your customers/site visitors. This extension enables you to easily configure tooltips that display ...